티스토리 뷰
[Keycloak/SSO] 리액트 Keycloak으로 로그인하고 스프링 시큐리티 Token으로 인증하기 | Cors 에러 해결 과정
YouJungJang 2024. 7. 12. 21:59
지난 포스팅에 이어서 이번에는 프론트엔드에 리액트, 백엔드에 스프링부트를 사용하는 경우 어떻게 키클록을 활용해야 하는지 예제 코드를 공유해 보겠다.
[Spring] Keycloak으로 SpringSecurity OAuth 구현하기 #2 | 스프링 시큐리티 키클록 연동 세팅하기
지난 게시글에서 키클록에 대해 다루면서 스프링 시큐리티 OAuth 구현을 위한 키클록 기본 세팅을 진행했다. [Spring] Keycloak으로 SpringSecurity OAuth 구현하기 #1 | 키클록이란?0. Keycloak 이란?Keycloak은
yuejeong.tistory.com
인턴 프로젝트를 단독으로 풀스택으로 진행하면서 프론트엔드를 리액트로 처음 구현하게 됐는데,
문법 자체에 낯설었던 탓에 초기 세팅에서 많은 시간이 소요됐다. 뿐만 아니라 키클록을 사용해 로그인을 구현했는데 이것을 구성하는 것에도 긴 시간이 걸렸다.
1차 시도: 프론트엔드와 백엔드 각각에 Keycloak OAuth Login 설정
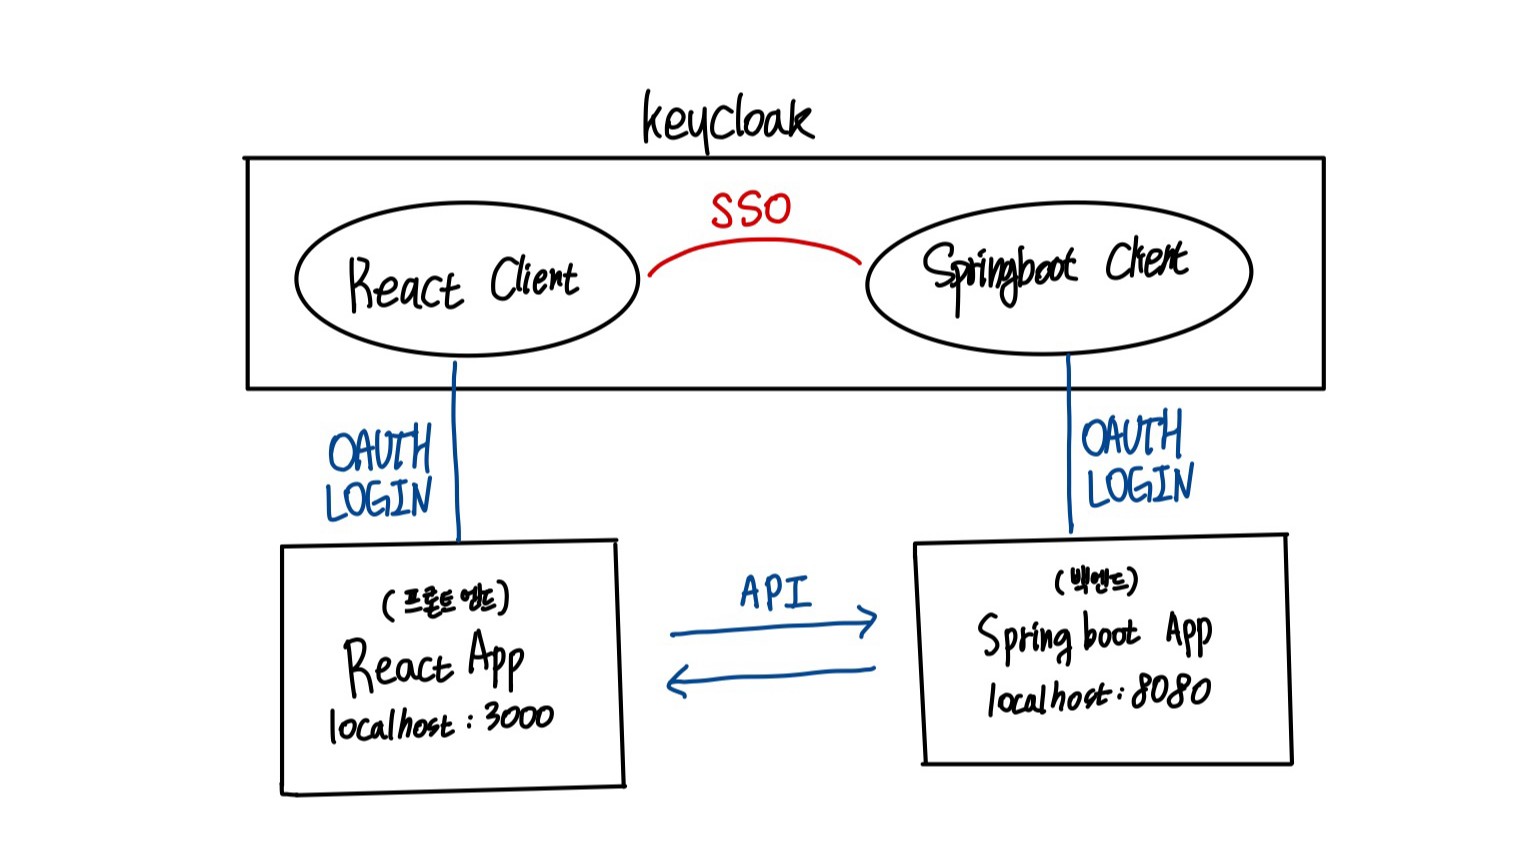
우선 처음에 구현했을 때 지난 포스팅에서 스프링 부트 OAuth Login을 구현했던 것처럼 프론트엔드 리액트에도 Oauth 로그인을 구현했다. 키클록이 SSO를 제공해 주니 프론트엔드에서 로그인하면, 백엔드에서도 자동으로 로그인되어 API 통신이 가능하겠지!라고 생각했던 것이다. 하지만 그것은 큰 착각이었다.
우선 리액트로 키클록 로그인을 구현해 보자. 리액트에서 제공해 주는 키클록 패키지가 있어서 이것을 활용하면 스프링부트보다 훨씬 간편하게 구현할 수 있다!
[1] 키클록 패키지 설치
npm install keycloak-js
npm install @react-keycloak/web
[2] 환경 변수 설정(선택 사항)
스프링부트 로그인 클라이언트와 동일한 realm에 리액트 로그인 클라이언트를 등록해 주고 다음과 같이 환경변수를 설정해 준다.
// Constants.js
export const config = {
    url: {
        KEYCLOAK_BASE_URL: ${KEYCLOAK_URL}, // 키클록 도메인
        REALM: "aws-springboot", // 키클록 Realm
        CLIENT: "react-app", // 키클록 리액트 로그인 클라이언트
        API_BASE_URL: "http://localhost:8077"
    }
}
[3] 로그인 구현
// App.jsx

import React from "react";
import { Routes, Route, Navigate } from "react-router-dom";
import { ReactKeycloakProvider } from '@react-keycloak/web'
import { Dimmer, Header, Icon } from 'semantic-ui-react'
import Keycloak from 'keycloak-js'
import AdminLayout from "layouts/admin";
import AuthLayout from "layouts/auth";
import {config} from "./Constants";
import PrivateRoute from "./util/PrivateRoute";
import useAuth from "./util/useAuth";


function App() {

    const keycloak = new Keycloak({
        url: `${config.url.KEYCLOAK_BASE_URL}`,
        realm: `${config.url.REALM}`,
        clientId: `${config.url.CLIENT}`
    })


    const initOptions = {
        onLoad: 'login-required',
        checkLoginIframe:false,
        pkceMethod: 'S256'
    }


    const handleOnEvent = async (event, error) => {
        switch (event) {
            case 'onAuthLogout':
                keycloak.logout();
                break;
            case 'onAuthRefreshError':
                keycloak.logout();
                break;
            case 'onAuthSuccess':
                const token = keycloak.token;
                useAuth.getState().login(token);
                break;
            default:
                break;
        }
    }

    return (
        <ReactKeycloakProvider
            authClient={keycloak}
            initOptions={initOptions}
            onEvent={(event, error) => handleOnEvent(event, error)}
        >
            <Routes>
                <Route path="auth/*" element={<PrivateRoute><AuthLayout /></PrivateRoute>} />
                <Route path="admin/*" element={<PrivateRoute><AdminLayout /></PrivateRoute>} />
                <Route path="/" element={<Navigate to="/admin" replace />} />
            </Routes>
        </ReactKeycloakProvider>
    );
}

export default App;
이렇게 하면 프론트엔드 앱 실행 후 localhost:3000 접속 시 바로 키클록 로그인 화면에 접속된다.

여기까지 한 뒤 백엔드와 API 통신을 시도하면 가장 먼저 프론트엔드와 백엔드 간의 CORS 에러가 발생한다.
Cors에러에 대한 자세한 설명은 생략하고, 이를 해결하는 방법은 스프링 시큐리티 설정에 CorsConfigurationSource를 빈으로 등록해 주면 된다.
각 프로젝트 환경에 따라 다르겠지만 나는 백엔드 스프링부트와 프론트엔드 리액트에 아래와 같이 설정해 줬다.
백엔드: 우선 백엔드에서 CorsCofig를 작성해 준다. 리액트의 도메인(localhost:3000)과, 백엔드 도메인(localhost:8080)을 AllowOrigin으로 설정해 주고, 사용하는 API 메서드를 모두 적어준다. 여기에 열어주지 않은 오리진과 도메인은 모두 차단된다.
    @Bean
    // CORS 설정
    CorsConfigurationSource corsConfigurationSource() {
        return request -> {
            CorsConfiguration config = new CorsConfiguration();
            config.setAllowedHeaders(Collections.singletonList("*"));
            config.setAllowedOrigins(Arrays.asList("http://localhost:3000", "http://localhost:8077"));
            config.setAllowedMethods(Arrays.asList("GET", "POST", "PUT", "DELETE", "OPTIONS"));
            config.setAllowCredentials(true);
            config.setMaxAge(CORS_MAX_AGE_SEC);

            UrlBasedCorsConfigurationSource source = new UrlBasedCorsConfigurationSource();
            source.registerCorsConfiguration("/**", config);

            config.setAllowCredentials(true);
            return config;
        };
    }
프론트엔드: 서버와 API 통신을 하기 위한 Axios 설정부에 'withCredentials:true'를 작성해 준다. 이렇게 하면 프론트엔드가 요청을 보낼 때 RequestOrigin에 localhost:3000이 설정된 채로 요청을 보내게 되고, 백엔드에서 해당 오리진을 열어줬기 때문에 더 이상 Cors 에러가 발생하지 않는 것이다.
import Axios from 'axios';
import { getAuthToken } from '../util/tokenUtil';
import { config } from "../Constants";

const baseURL= config.url.API_BASE_URL;

// -- Axios
const axios = Axios.create({
    baseURL,
    withCredentials: true,
});

const axiosWithToken = Axios.create({
    baseURL,
    withCredentials: true,
})

axiosWithToken.interceptors.request.use(config => {
    const accessToken = getAuthToken();
    if (config.headers && accessToken) {
        config.headers['Authorization'] = `Bearer ${accessToken}`;
    }
    return config;
});

export { baseURL, axios, axiosWithToken };
이렇게 해서 localhost:8077(스프링부트)과 localhost:3000간의 CORS 에러는 사라진다.
하지만 이번에는 키클록과 리액트 간의 CORS 에러가 발생한다.

산 넘어 산..
이놈의 Cors에러 이번에는 또 어떤 게 문제인 건지 네트워크를 뜯어봤다.

자세히 살펴보니 Origin이 Null로 설정되어 있었다.
아니, 분명 프론트엔드에서 백엔드로 요청 보낼 때 Origin을 담아서 보내는데 왜 백엔드는 그 요청을 다시 키클록으로 전달하는 것이며, 그랬을 때 origin은 왜 null이 되어 있는 것인가.
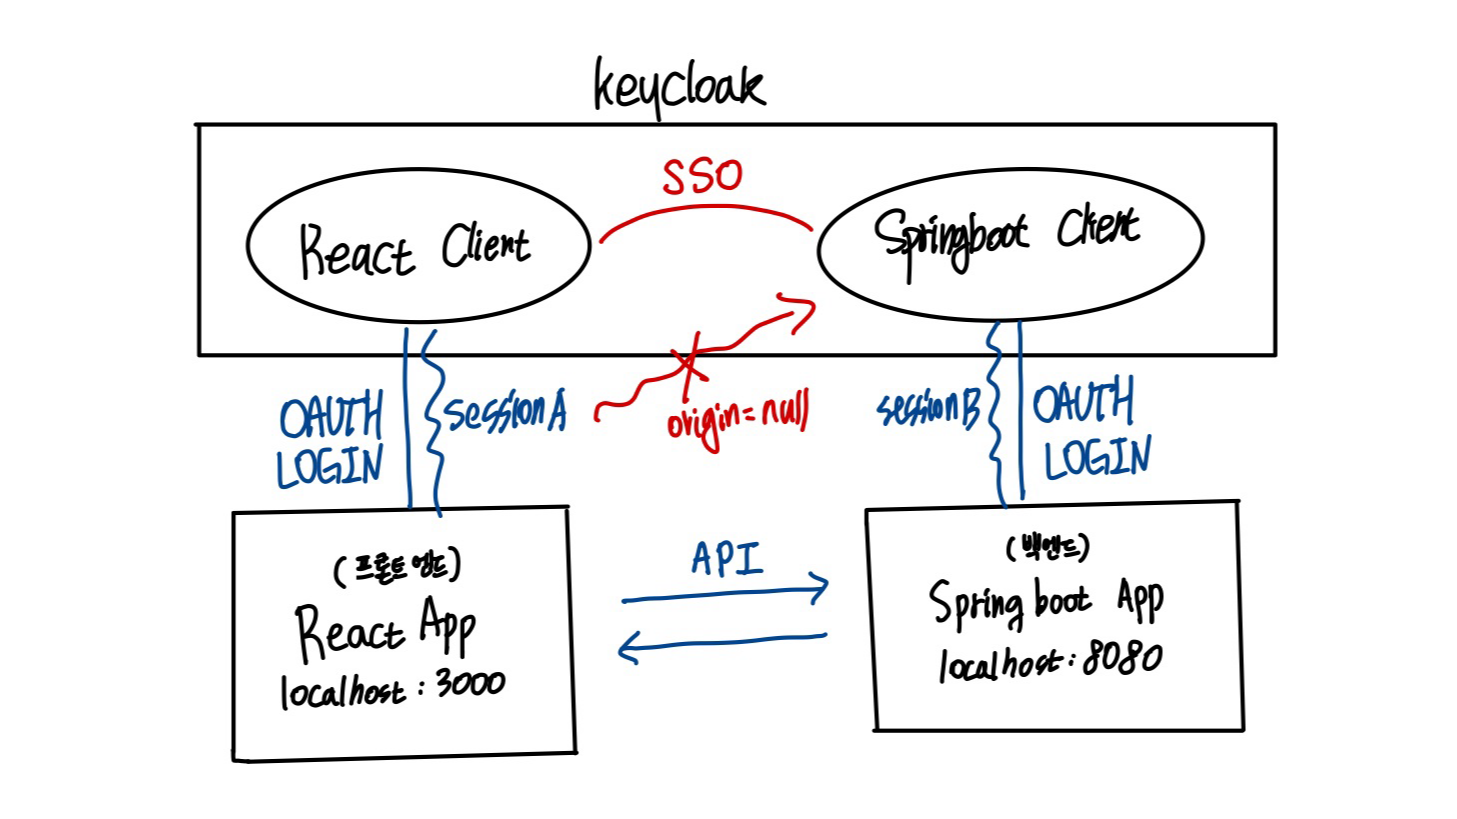
이 부분에서 엄청난 삽질을 했다. 그림과 함께 살펴보자
내가 처음에 생각했던 구조는 다음과 같다.

리액트 클라이언트와 스프링부트 클라이언트를 동일한 Realm에 등록해 줬으니 키클록의 SSO 기능으로 리액트에서 로그인한 클라이언트는 스프링부트에도 권한이 있으므로 API통신이 가능할 것이라고 예상했다.
하지만 막상 확인해 보니 그렇지 않았다.
리액트에서 로그인으로 받아온 토큰은 스프링부트에서 로그인되지 않았고, 리액트의 세션조차 백엔드에서 먹히지 않았다. 하나의 유저로 로그인했음에도 세션이 서로 달랐던 것이다.

키클록의 SSO 작동 원리 부분에 대해서는 좀 더 공부가 필요할 것 같다. 추후에 AWS Quicksight와 SSO 구축에 성공했는데 이 부분은 나중에 다뤄보겠다.
그러니까 SSO가 안되니까 리액트에서 보낸 요청에 대해 백엔드는 인증되지 않는 사용자라 판단해서 백엔드 측 키클록 클라이언트인 Springboot Client 로그인을 호출해서 키클록이 프론트엔드의 요청을 받게 된다.

(w3c) 웹표준에 따르면
If a cross-origin resource redirects to another resource at a new origin, the browser will set the value of the Origin header to null after redirecting.
cors 가 새 오리진으로 리다이렉션 되는 경우, 브라우저는 Origin 헤더를 null로 설정하는 규약이 있는 걸 알게 되었다.
그래서 origin은 null인 프론트엔드의 요청을 받은 키클록은 Cors 에러를 뱉은 것이다.
출처: https://w3c.github.io/webappsec-cors-for-developers/#identify-yourself-and-get-permission-simple-request-read-permissions

그러므로 여기서 구조를 완전히 바꿔야겠다는 생각이 들었다. 애초에 리액트 클라이언트에서 로그인했을 때 생성되는 세션과 스프링부트에서 생성되는 세션이 달라서 각자 클라이언트를 두고 각자 OAuth를 하는 게 아닌 것이라고 생각했다.
그래서 구현한 방법은 OAuth 로그인을 리액트만 남겨두고, 스프링부트는 리액트에서 보내주는 JWT 토큰을 사용하는 방법이다.

그럼 리액트에서는 바꿀 것이 없고, 스프링부트에서만 Security 설정을 조금 다듬으면 된다.
나는 다음과 같이 설정해 줬다.
// Security Config
import lombok.RequiredArgsConstructor;
import org.keycloak.adapters.springsecurity.KeycloakConfiguration;
import org.springframework.context.annotation.Bean;
import org.springframework.context.annotation.Configuration;
import org.springframework.security.config.annotation.web.builders.HttpSecurity;
import org.springframework.security.config.annotation.web.configuration.EnableWebSecurity;
import org.springframework.security.config.annotation.web.configurers.AbstractHttpConfigurer;
import org.springframework.security.config.http.SessionCreationPolicy;
import org.springframework.security.web.SecurityFilterChain;
import org.springframework.web.cors.CorsConfiguration;
import org.springframework.web.cors.CorsConfigurationSource;
import org.springframework.web.cors.UrlBasedCorsConfigurationSource;
import java.util.*;


@Configuration
@EnableWebSecurity
@KeycloakConfiguration
@RequiredArgsConstructor
public class SecurityConfig {
    long CORS_MAX_AGE_SEC = 3600;

    private final JwtAuthConverter jwtAuthConverter;

    @Bean
    protected SecurityFilterChain filterChain(HttpSecurity http) throws Exception {

        http
                .csrf(AbstractHttpConfigurer::disable)
                .authorizeHttpRequests((authorizeRequests) ->
                        authorizeRequests.requestMatchers("/public/**", "/v3/api-docs/**",
                                        "/swagger-ui/**", "/swagger-resources/**").permitAll()
                                .anyRequest().authenticated()
                )
                .oauth2ResourceServer(oauth2ResourceServer -> oauth2ResourceServer.jwt(
                        jwt -> jwt.jwtAuthenticationConverter(jwtAuthConverter)))
                .sessionManagement(sessionManagement -> sessionManagement.sessionCreationPolicy(SessionCreationPolicy.STATELESS))
                //.oauth2Login(Customizer.withDefaults()) // 스프링 시큐리티 로그인 삭제
                .cors(corsConfigurer -> corsConfigurer.configurationSource(corsConfigurationSource()))
        ;

        return http.build();
    }
}
우선 Security Config에서는 다음과 같이 기존 oauthLogin을 삭제해 주고, 대신 oauthReseourceServer를 설정해 줬다.
// application.yml
spring:
  security:
    oauth2:
      resourceserver:
        jwt:
          issuer-uri: $JWT.ISSUER_URI
  graphql:
    cors:
      allowed-origins: http://localhost:3000
jwt:
  auth:
    converter:
      resource-id: springboot-login
      principal-attribute: preferred_username
  expiration_time: 86400000
  secret: $JWT.SECRET
다음과 같이 oauth2 ResourceServer에 키클록 url을 담아준다.
그럼 이제 JWT Converter만 추가로 구현하면 프론트로부터 받은 JWT 토큰으로 보안 인증 처리를 할 수 있게 된다.
끝!
Reference:
Spring Blog
백오피스 개발하면서 발생했던 에러 사항중 하나인 CORS 에러에 대해서 공유하려고 합니다. 백오피스 구조로써 2가지를 아키텍쳐를 생각해두고 있는데 첫번째의 경우는 이렇게 백엔드(Spring Boot)
hkpark130.p-e.kr:8100
GitHub - ivangfr/springboot-react-keycloak: The goal of this project is to secure movies-app using Keycloak (with PKCE). movies-
The goal of this project is to secure movies-app using Keycloak (with PKCE). movies-app consists of two applications: one is a Spring Boot Rest API called movies-api and another is a React applicat...
github.com
